Mirage Minecraft Mod
Project overview
The original Oasis is a world model that generates live Minecraft footage which responds to user input.
MirageLSD is Decart's real-time video-to-video model that can perform live video restyling.
We wanted to create an experience similar to the original Oasis by running actual Minecraft footage through MirageLSD, and playing the result live.
The result is a mod we called Oasis 2.0:
This article will explain how to build your own Minecraft mod using MirageLSD. You will learn how to:
- Create a Minecraft mod
- Connect to MirageLSD
- Capture the game footage and stream it live through MirageLSD
- Replace the game visuals with the model's output
Programming languages and technologies involved:
Join our Discord community for additional guidance
Intro to Minecraft modding
Modding Minecraft means changing the game's code to add new features or tweak existing ones. Since the game is written in Java, mods are usually made in Java or Kotlin, which both compile to the JVM. To make things easier and to accommodate many mods at once, the community has built several frameworks for modding, including:
- Fabric
- Forge
- Quilt
- NeoForge
Each one comes with its own approach and ecosystem for building mods.
For this guide we will be using Fabric, as it's a popular choice for new mods, and target Minecraft 1.21.8 (released July 2025).
Detailed versions
| Component | Version |
|---|---|
| Minecraft | 1.21.8 |
| Yarn mappings | 1.21.8+build.1 |
| Fabric Loader | 0.17.2 |
| Fabric Language Kotlin | 1.13.6+kotlin.2.2.20 |
| Fabric API | 0.133.4+1.21.8 |
| Fabric Loom | 1.10-SNAPSHOT |
| JDK (Java) | OpenJDK 21.0.4 |
| Kotlin | 2.2.20 |
| webrtc-java | 0.14.0 |
Getting started with Fabric
To get started with mod development using Fabric, visit https://fabricmc.net/develop/.
You can generate a starter project either using Fabric's template mod generator tool, or by installing Deno and running Fabric's command line tool:
deno run https://fabricmc.net/cli init
When setting up, we recommend enabling the "Kotlin Programming Language" option to use the Kotlin language instead of Java where possible. See "Advantage of using Kotlin" in Fabric's wiki. This guide uses Kotlin for most examples, though you can translate them to Java with your preferred LLM if needed.
💡 Pro tip: Now is a great time to initialize a Git repository and commit the empty template.
To build your project, use the command ./gradlew build. The initial build may take a minute, but later runs should be much faster.
To run the project, use the command ./gradlew runClient. This will launch Minecraft with your mod loaded.
❕ If you get an error message when running your empty project template that says "Incompatible mods found", try updating the value of
fabric_versionon the last line of the file./gradle.propertiesto0.133.4+1.21.8.
You should now have a working Minecraft mod that does nothing 🎉
💡 Pro tip: You don't have to write the
./gradlewsubcommand, as it will understand prefixes as long as they don't clash with another subcommand. That means you can use./gradlew bto build and./gradlew runcto run. It also supports running multiple subcommands (called "tasks") in sequence, so use./gradlew b runcto build and run your project in one command.
💡 To distribute your mod to others, share the
.jarfile generated in./build/libs/named something likeyour-mod-name-1.0.0.jar. This is the file that other players can drop into their mods folder, and that you can upload to mod sharing platforms such as Modrinth or CurseForge. When uploading to such platforms, remember to specify Fabric API and Fabric Language Kotlin as dependencies.
For an in-depth guide on Fabric modding see the introductions on Fabric's documentation and Fabric's wiki. These are the main things you should know:
- Like most Minecraft mod loaders, Fabric uses SpongePowered's Mixin library to modify Minecraft's code. We'll use it to inject our own logic at specific points in the game's code with classes called "mixins". It's important to know how to use it. Here are the relevant pages from Fabric's wiki:
- Client vs. server code: When you join a remote server, the server handles the game logic while your client handles what you see on screen. In singleplayer, Minecraft still starts a local server, so the setup works the same way. Fabric separates these concerns: Code that affects game logic belongs on the server, while code that only affects visuals belongs on the client. By convention, server code goes in
./src/main/and client code in./src/client/. Since we want to affect the visuals, and we also want the mod to work on remote vanilla servers, our mod will be client‑only. That means we'll mostly be working in./src/client/. - The structure of a Fabric mod project (Fabric docs):
./src/main/resources/fabric.mod.json: This file describes your mod to Fabric. It defines your mod'sid,name,icon, and most importantly theentrypointsandmixins. We will use*as a placeholder for your mod's ID when showing file paths../src/main/resources/*.mixins.json: This file defines a list of server-side mixins to apply to Minecraft. Server-side specifically the mixins that affect the game itself and not just the client. By default you should seeExampleMixinlisted, which points to./src/main/java/*/mixin/ExampleMixin.java. Our mod will be client‑only, so we recommend deletingExampleMixinfrom the list of mixins and itsjavafile implementation. You can even delete this entire JSON file and the reference to it infabric.mod.jsonundermixins../src/client/resources/*.client.mixins.json: This file defines the list of client‑only mixins. Our mod will be client-only, so we will be adding to this list. By default you should seeExampleClientMixinlisted, which points to./src/client/java/*/mixin/client/ExampleClientMixin.java../src/main/kotlin/*/*.kt: This file is the main entrypoint of the server-side of your mod. We recommend deleting this file and the reference to it infabric.mod.jsonunderentrypoints../src/client/kotlin/*/*Client.kt: This file is the main entrypoint of the client-side of your mod. It defines a function calledonInitializethat runs when the game launches.
Before diving into mixins and injects, you'll need access to Minecraft's decompiled source code. Without it, you won't know what classes exist or where to inject. Run the command ./gradlew genSources, which generates a sources JAR at the following location:
./.gradle/loom-cache/minecraftMaven/net/minecraft/minecraft-clientOnly-*/*-net.fabricmc.yarn.*/minecraft-clientOnly-*-net.fabricmc.yarn.*-sources.jar
Unzip this JAR (it's just a zip file) to a convenient location, and you'll be able to browse the game's source code.
The main mixin
Our goal is to capture the game footage, stream it live through MirageLSD, and then replace the game visuals with the model's output. Therefore we care about when and where Minecraft renders each part of the game window. Here's a high level overview of the classes and methods involved in rendering different parts of the game:
Rendering Mermaid diagram…
net.minecraft.client.MinecraftClient: This is the main class for the client. You can get the global (singleton) instance of this class by callingMinecraftClient.getInstance(). TheMinecraftClient.run()method executes the main client loop, and callsMinecraftClient.render()on every frame, which in turn callsGameRenderer.render().net.minecraft.client.render.GameRenderer::render(): This method draws everything on screen, from 3D blocks to 2D menus. It starts by callingGameRenderer::renderWorld(), which calls bothWorldRenderer::render()to render the 3D Minecraft world andGameRenderer::renderHand()to render the 3D hand (which may be holding a block or a tool). AfterGameRenderer::renderWorld()finishes,GameRenderer::render()callsInGameHud::render().net.minecraft.client.render.WorldRenderer::render()renders the entire 3D Minecraft world: blocks, fluids, entities, block entities, the sky, clouds, particles, and more.net.minecraft.client.gui.hud.InGameHud::render(): This method renders the HUD (heads-up display): the hotbar, the experience bar, the crosshair at the center of the window, the chat, and the F3 screen (DebugHud::render()), and more. Basically all the 2D parts on top of the 3D world.
Since we control the game we might be able to reorder or disable the various stages of rendering, but for our purposes there is a perfect injection point: Right after the 3D world renders, including the hand, but before the 2D parts render, such as the hotbar and the inventory.

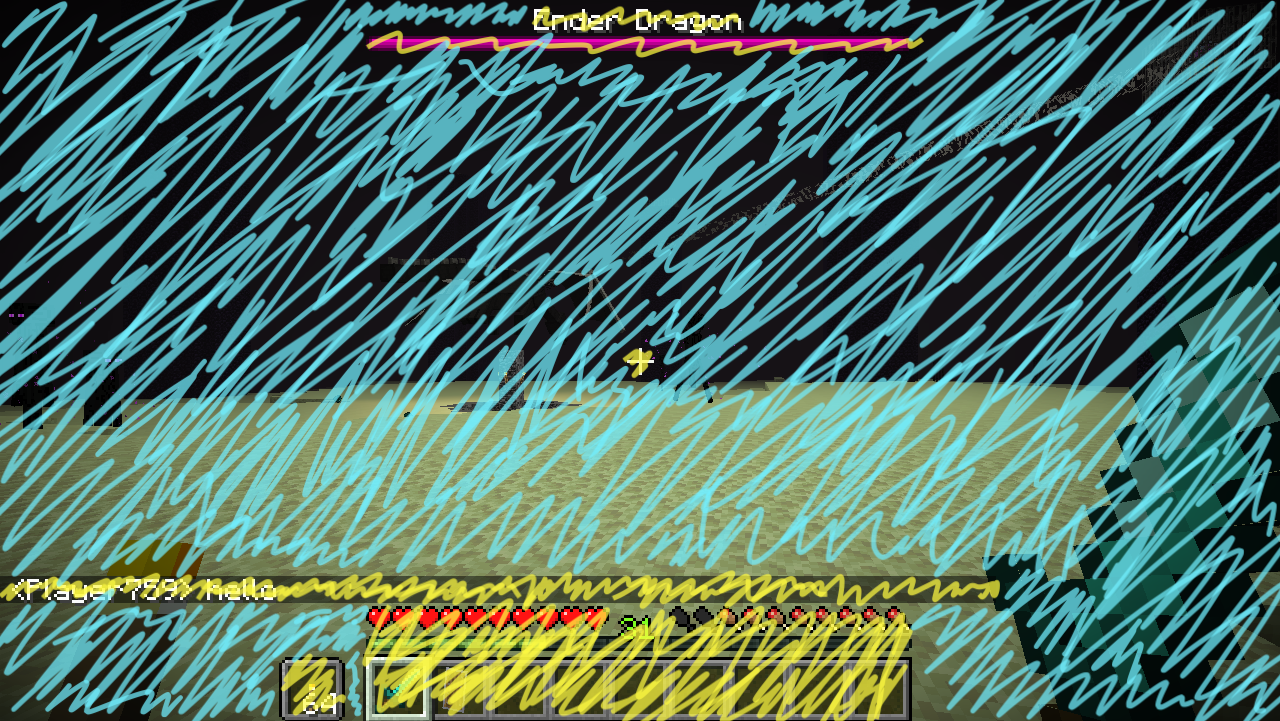
For illustration: the blue parts are 3D, rendered in GameRenderer::renderWorld(), and the yellow parts are 2D, rendered in InGameHud::render() on top of the 3D world.
We want to capture and replace the screen right in between these two parts. That way, the model will see and modify the 3D game, and the 2D hotbar and menus will be rendered unaffected on top of the model's output. So we should inject code right after GameRenderer::renderWorld(). Here's how:
-
Add a method called
afterRenderWorld()to your client entrypoint (./src/client/kotlin/*/*Client.kt):package ai.decart.oasis import net.fabricmc.api.ClientModInitializer object OasisClient : ClientModInitializer { override fun onInitializeClient() { println("onInitializeClient") } fun afterRenderWorld() { println("afterRenderWorld") } } -
Create a new client mixin
./src/client/java/*/mixin/client/GameRendererMixin.javathat is a@MixinforGameRenderer, with a method that@Injects torenderWorldwhen it returns:package ai.decart.oasis.mixin.client; import net.minecraft.client.render.GameRenderer; import org.spongepowered.asm.mixin.injection.At; import org.spongepowered.asm.mixin.injection.callback.CallbackInfo; import org.spongepowered.asm.mixin.injection.Inject; import org.spongepowered.asm.mixin.Mixin; import ai.decart.oasis.OasisClient; @Mixin(GameRenderer.class) public class GameRendererMixin { @Inject(method = "renderWorld", at = @At("RETURN")) private void afterRenderWorld(CallbackInfo ci) { OasisClient.INSTANCE.afterRenderWorld(); } } -
Add the new mixin to the list of client mixins in
./src/client/resources/*.client.mixins.jsonby adding the item"GameRendererMixin"to theclientarray.
Run the game, and you should see onInitializeClient printed once at startup. After joining a world, you should then see an endless stream of afterRenderWorld messages, confirming that everything is set up correctly.
For more details on how rendering works in Minecraft, refer to the sections Basic Rendering Concepts and Rendering in the World in Fabric's documentation.
OpenGL
Our next goal is to use our mixin to capture the screen and replace it with a different frame. To accomplish this, we'll need to dive deeper into the low-level details of how Minecraft renders things to your screen. Minecraft is built using a library called LWJGL: Lightweight Java Game Library, a cross‑platform library for game development. Through LWJGL, Minecraft can:
- Open and manage a window
- Render graphics inside the window using OpenGL
- Process input from the keyboard, mouse, and controllers
While LWJGL abstract away operating system differences, OpenGL abstracts away hardware differences, and specifically GPUs. This allows Minecraft to use the same API to interact with any GPU, with the GPU's driver handling the translation of OpenGL commands into hardware-specific instructions.
These are amazing resources you can use to learn how to use OpenGL:
Here's what you'll need to know going forward:
GlStateManager:- OpenGL is a state-based API, meaning it maintains an internal state that controls how rendering commands are interpreted and executed. Instead of passing all parameters directly to each function, you configure the global OpenGL state (such as current color, textures, shaders, or transformations), and subsequent draw calls use that state until it is changed. This design requires carefully managing and tracking state changes.
- In Minecraft, this challenge is addressed by the
GlStateManagerclass, which provides a layer of abstraction over raw OpenGL calls. Instead of directly invoking state‑changing functions, the game usesGlStateManagerwrappers that both perform the OpenGL call and record the change internally. This approach ensures different systems within Minecraft stay synchronized about the current rendering state, and avoid redundant operations. - Therefore, before using an OpenGL function directly through LWJGL, it's best to first check whether
GlStateManagerprovides a wrapper for it, and use that wrapper whenever possible to maintain consistent state tracking. - Many rendering-related functions can only be called from the game's main thread (also known as the render thread). If you ever find yourself running on a different thread and in need to call a function that calls
RenderSystem.assertOnRenderThread(), you can schedule a piece of code to run on the main thread usingMinecraftClient.getInstance().execute { ... }.
- To access OpenGL APIs using LWJGL, search the API you need in the search bar at LWJGL's docs, import the relevant OpenGL version (e.g.
import org.lwjgl.opengl.GL15), and you'll be able to call that function (e.g.GL15.glMapBuffer(...)). GlConst: Most OpenGL functions (orGlStateManagerfunctions) have parameters which expect specific enum values. While you can access these constants using LWJGL (e.g.GL11.GL_RGBA), most of them are available under Minecraft'sGlConstclass (e.g.GlConst.GL_RGBA).- Texture: A texture is an OpenGL object that stores an image, which is a 2D array of pixel colors. For our purposes, if you see the word mipmap you can ignore it.
Minecraft has an abstraction over textures: the classes
GpuTextureandGlTexture. - Framebuffer Object (FBO): An FBO is an OpenGL object that you can render graphics to and from. An FBO is only a container for various objects which hold pixels, such as textures.
Minecraft has an abstraction over FBOs: the classes
FramebufferandSimpleFramebuffer. - Pixel Buffer Object (PBO): A PBO is an OpenGL object that represents a buffer in memory, meant for transferring pixels to/from textures/FBOs.
Minecraft has an abstraction over PBOs: the classes
GpuBufferandGlGpuBuffer.
Capturing and replacing the screen: The plan
After GameRenderer::renderWorld(), the 3D world is fully rendered to Minecraft's main FBO, which we can access using MinecraftClient.getInstance().framebuffer. This FBO contains the pixel data shown in the Minecraft window. We want to copy its pixel data, then replace its pixel data with the frame returned from the model.
We can create PBOs to let us read & write pixels to that FBO. To control the resolution of frames sent to the model, and handle mismatches between incoming frame resolution and window size, we'll introduce intermediate FBOs for scaling before reading or writing to/from the window FBO.
The full plan:
- Capturing:
- Create a PBO, FBO, and a texture attached to the FBO
glBlitFrameBufferto copy from the window FBO to our FBO, scaledglReadPixelsto copy from our FBO's texture to our PBOglMapBufferto map our PBO to memory for reading- Copy the pixels from the PBO's memory and send them to the model
- Replacing:
- Create a PBO, FBO, and a texture attached to the FBO
glMapBufferto map our PBO to memory for writing- Copy the pixels from the model's output to the PBO's memory
glTexSubImage2Dto copy from our PBO to our FBO's textureglBlitFrameBufferto copy from our FBO to the window FBO, scaled
Capturing the screen
Code
import java.nio.ByteBuffer
import com.mojang.blaze3d.buffers.GpuBuffer
import net.minecraft.client.gl.SimpleFramebuffer

class WindowDownloader(val width: Int, val height: Int) : AutoCloseable {
	// create an FBO and a PBO for reading
	val fbo = SimpleFramebuffer(/* name */ null, width, height, /* useDepthAttachment */ false)
	val fboHandle = Graphics.getOrCreateColorFBO(fbo)
	val pbo = Graphics.device.createBuffer(null, GpuBuffer.USAGE_COPY_DST or GpuBuffer.USAGE_MAP_READ, width * height * 4)

	fun captureWindow(width: Int, height: Int, callback: (bufferRGBA: ByteBuffer) -> Unit) {
		// copy the window FBO to our FBO, scaled
		Graphics.blitFBO(
			Graphics.windowFBOHandle, Graphics.windowWidth, Graphics.windowHeight,
			fboHandle, width, height,
		)

		val commandEncoder = Graphics.device.createCommandEncoder()

		// copy our FBO to our PBO
		// NOTE: calling `mapBuffer` inside the `Runnable` breaks on Windows
		commandEncoder.copyTextureToBuffer(fbo.colorAttachment, pbo, 0, Runnable {}, 0, 0, 0, width, height)

		// map our PBO to the CPU for reading
		commandEncoder.mapBuffer(pbo, /* read */ true, /* write */ false).use {
			val bufferBGRA = it.data()
			callback(bufferBGRA)
		}
	}

	override fun close() {
		fbo.delete()
		pbo.close()
	}
}
Replacing the screen
Code
import java.nio.ByteBuffer

import org.lwjgl.opengl.GL15

import com.mojang.blaze3d.buffers.GpuBuffer
import com.mojang.blaze3d.opengl.GlConst
import com.mojang.blaze3d.opengl.GlStateManager

import net.minecraft.client.gl.SimpleFramebuffer
import net.minecraft.client.texture.GlTexture

import ai.decart.oasis.mixin.client.GlGpuBufferAccessor

class WindowUploader(val maxWidth: Int, val maxHeight: Int) : AutoCloseable {
	// create an FBO and a PBO for writing
	val fbo = SimpleFramebuffer(/* name */ null, maxWidth, maxHeight, /* useDepthAttachment */ false)
	val fboHandle = Graphics.getOrCreateColorFBO(fbo)
	val pbo = Graphics.createMutableBuffer(GpuBuffer.USAGE_COPY_SRC or GpuBuffer.USAGE_MAP_WRITE, maxWidth * maxHeight * 4)

	fun drawImageToWindow(bufferRGBA: ByteBuffer, width: Int, height: Int) {
		// bind the PBO
		GlStateManager._glBindBuffer(GlConst.GL_PIXEL_UNPACK_BUFFER, (pbo as GlGpuBufferAccessor).id)

		// reallocate the PBO to let the GPU know we don't care about the previous contents, should be faster
		GlStateManager._glBufferData(GlConst.GL_PIXEL_UNPACK_BUFFER, bufferRGBA.capacity().toLong(), GlConst.GL_STREAM_DRAW)

		// map the PBO to memory
		val pboBuffer = GL15.glMapBuffer(GlConst.GL_PIXEL_UNPACK_BUFFER, GlConst.GL_WRITE_ONLY, width * height * 4L, null)!!

		// update the PBO with the image from the buffer
		bufferRGBA.rewind()
		pboBuffer.put(bufferRGBA)
		bufferRGBA.rewind()

		// unmap the PBO
		GlStateManager._glUnmapBuffer(GlConst.GL_PIXEL_UNPACK_BUFFER)

		// bind the texture
		GlStateManager._bindTexture((fbo.colorAttachment as GlTexture).glId)

		// copy the PBO to the texture
		GlStateManager._pixelStore(GlConst.GL_UNPACK_SKIP_ROWS, 0)
		GlStateManager._pixelStore(GlConst.GL_UNPACK_ROW_LENGTH, 0)
		GlStateManager._pixelStore(GlConst.GL_UNPACK_SKIP_PIXELS, 0)
		GlStateManager._pixelStore(GlConst.GL_UNPACK_ALIGNMENT, 4)
		GlStateManager._texSubImage2D(GlConst.GL_TEXTURE_2D, 0, 0, 0, width, height, GlConst.GL_RGBA, GlConst.GL_UNSIGNED_BYTE, 0)

		// unbind the PBO
		GlStateManager._glBindBuffer(GlConst.GL_PIXEL_UNPACK_BUFFER, 0)

		// unbind the texture
		GlStateManager._bindTexture(0)

		// now the region from `(0, 0)` to `(width, height)` of our FBO's texture contains the image from the buffer
		// copy that region to the window FBO, scaled
		Graphics.blitFBO(
			fboHandle, width, height,
			Graphics.windowFBOHandle, Graphics.windowWidth, Graphics.windowHeight,
		)
	}

	override fun close() {
		fbo.delete()
		pbo.close()
	}
}
Our MirageLSD protocol
Code
import kotlinx.serialization.Serializable
import kotlinx.serialization.SerialName

@Serializable
data class IceCandidate(
	val candidate: String,
	val sdpMid: String,
	val sdpMLineIndex: Int,
)

// outgoing messages

@Serializable
sealed interface MirageOutgoingMessage

@Serializable
@SerialName("prompt")
data class MirageOutgoingPromptMessage(
	val prompt: String,
	val enhance_prompt: Boolean,
) : MirageOutgoingMessage

@Serializable
@SerialName("offer")
data class MirageOutgoingOfferMessage(
	val sdp: String,
) : MirageOutgoingMessage

@Serializable
@SerialName("ice-candidate")
data class MirageOutgoingIceCandidateMessage(
	val candidate: IceCandidate,
) : MirageOutgoingMessage

// incoming messages

@Serializable
sealed interface MirageIncomingMessage

@Serializable
@SerialName("ice-candidate")
data class MirageIncomingIceCandidateMessage(
	val candidate: IceCandidate,
) : MirageIncomingMessage

@Serializable
@SerialName("answer")
data class MirageIncomingAnswerMessage(
	val sdp: String,
) : MirageIncomingMessage

@Serializable
@SerialName("error")
data class MirageIncomingErrorMessage(
	val error: String,
) : MirageIncomingMessage
Ideas to spark creativity
- Add an easter egg: when the prompt contains the name of any mob in the game, render several ghostly versions of it that follow the player around. Since the mod is client-only, don't spawn real mobs, just simulate their presence visually.
- Toggle between game output and model output when passing through a portal made of glass, or even looking through it. See the Immersive Portals mod for how it might look, and Sebastian Lague's coding adventure for how to implement it with OpenGL's stencil buffer. You can also detect the presence of a sign on the portal, and use its text as the prompt. Instead of toggling the model on and off, you can also make the world inside the portal render a different prompt, which requires creating parallel connections to the model with different prompts.